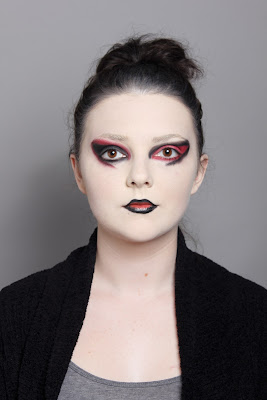
Sunday, 13 December 2015

Timed Assessment - Me as a make-up artist

Overall I was happy with the finished make up look and the outcome of the whole assessment. I managed to arrive on time and be prepared which helped me feel more confident, relaxed and in control of the situation. I started by setting up all the equipment that I will need such as, make up products, brushes, disposable mascara wands, q tips and cotton pads. I made sure I washed my hands before starting the process. I began by cleansing my partners face, then toning and lastly moisturizing it I made sure I do not put moisturized on the nose as that would've prevented from make up covering that area properly. I started by applying the correct color foundation that matched her skin, starting fro the center of the face and working outwards. After I set everything with loose powder using the sponge I moved on to eye make up which was the most difficult part as it required a lot of concentration and focus. During the assessment I kept looking straight into the mirror to see if everything is even and looking how it should. After completing the eye make up I moved on to eye lashed and brows. For the eye lashes I used black super color and disposable mascara wand to apply it. For the eye brows I used foundation to make the eye brows neutral using new mascara wand again. For the lips I needed to used two colors to create the desired look I started with the black super colors and lined the lips filling the only half way, leaving the middle blank. The middle of the lips needed to be red so I grabbed red supercomputer and filled them in. I made sure everything was blended properly including the foundation, I blended it to the neck and ears. The only concern that I had was that in pictures the red super color on the lips did not appear as red as I wanted it to be, it was more pink, as well as the red eye shadow on the eyes was looking a lot more pink than red which did make me a little bit disappointing. Overall I was happy that I managed to work with somebody else's design and try to recreate it to the best of my ability even if it wasn't perfect I'm still happy with my time management skills as well as make up application skills.


Times Assessment - Me as a model

Overall I was pleased with the outcome of my make up design that I created, however there are a few details that needed improvement, such as more blending for eye make up. Before the make over started, my partner set up everything well, all the make up products, brushes, and q tips if the mistake was made were on display, she cleansed, toned and moisturized my face properly before the make over. She started by applying Illamsqua skin base foundation, starting from the center which was correct way of doing it, she was able to blend it well into my neck and ears so there is no mask like affect. Before starting to draw the shapes around my eyes, my partner felt a little nervous as she knew that both sides need to be symmetrical. We both communicated well during the assessment, she was comfortable to ask me questions and my opinion if it looks good so far. Both sides to me appeared symmetrical so I did tell her that she done a good job. My partner was trying very hard to recreate the design, I was able to notice that while during our practice days she wanted to recreate it the best way that she could, she clearly wanted to do well on her assessment day, which I think she did. I was happy with the dramatic eye make up look and the glitter which I wanted to include as very attention attracting detail, because wealthy Elizabethan women loved the attention especially from men.
My partner was able to finish the design on time and did not had to rush anything which is very important, because rushing can affect the outcome of the make over. Even though there were a few details that could have been corrected such as blending more around eye area, it did not affect the overall look and I was still pleased with the outcome. From this experience I think my partner learnt the importance in time management in situations like this, and how important is practice before the assessment, the more you practice the easier ad quicker you can do make up which is key.


Friday, 11 December 2015

My second practice of my partner's design

For the second practice of my partners design, we changed a few details. For the lips my partner decided she wanted the inner part to be more red and the edges black, slightly blended together in the middle. My techniques has definitely changed, I found different ways to apply make up to save more time but also look neat, I felt a lot more confident than the first time while I was applying make up, I timed myself to be able to see if I can achieve this look in time for my timed assessment and I was able to accomplish that. Also I was able to do more precise eye make up look, to make sure they both even, in my first practice session I did not feel comfortable at all applying bright eye shadows as I thought that it was very hard to make both eyes equal when doing such dramatic make up, also taking a lot more time.
I was very happy with my second practice and was able to feel more confident and less nervous which also affected my performance, the lines were a lot more neat and precise when it came to doing eye make up as well as lips.


My first practice of my partners design

I started by looking whether my partner has dry, normal or oily skin. My partners skin appeared to be more on the normal to dry skin type, her skin was not sensitive and did not react to any of the products that I have used which made the application much easier, however I have noticed that my partner has sensitive/watery eyes if anything gets into them, so I was very careful while applying make up around her eyes to avoid discomfort for her as well as the make up smudging. While I was trying to recreate my partner's design, my partner talked me through and explained the different applications that I could do and also the specific products and colors that she wants me to use for her design. While I was applying supercolor around the eyes I have noticed that it started creasing very easy as it was creamy and not powder based, also much more difficult to work with, so we both decided that instead of supercolor I'll use eye shadow which was much easier alternative.
I was pleased with the outcome of my first practice of her design as I thought I was able to recreate the design that she wanted pretty well, I still needed practice to become more comfortable and be able to do it on time.


My partner's first practice of my design

My make up design:-


Products used for my make up design:-

- Illamasqua skin base foundation
- Illamasqua loose powder
- White supercolor (for the eyes) and red supercolor (for the lips)
- Illamasqua black eye shadow (for the eyes, contour)
- Illamasqua white pigment glitter (for the eyes, lips)

Brushes used for my make up design:-

- Kabuki buffing brush (to blend out the skin base foundation)
- Flat foundation brush(to apply skin base foundation)
- Powder sponge (to apply loose powder)
- Small angled brush (to apply supercolor on the lips)
- Small flat eye shadow brush (to apply black eye shadow, white supercolor)
- Small brush (to apply glitter)
-Big blending brush (to contour)
-Stippling brush (to remove excess powder)


Before letting my partner have her first practice of my design, I made sure that I was able to create the design myself, and help to explain in more detail the application and different techniques. I was guiding my partner step by step explaining the products I used to create this design. The main detail of this look was glitter, I wanted it to stand out the most. While practicing the make up look of this design my partner told me that she was struggling with applying black supercolour because it is very hard to correct the mistake, so I have decided to change it to the black eye shadow instead, my partner was happy with the decision and was able to recreate the design better than using the black supercolor. At first I wasn't sure that I wanted glitter on my lips, but after we tried both looks glitter and without, the glitter lips appeared more appealing as I wanted pretty dramatic make up look. After my partner finished her first practice of my design I was quite happy with the result, the only thing missing for me was more blended eye make up edges however I was still pleased with the outcome.


Thursday, 10 December 2015

Technical make up lesson - Elizabethan make up

Products that I have used:-

- Illamasqua skin base
-Illamasqua loose powder
- Supercolour
-Krylon lip palette
- Blush palette

Brushes that I have used:-

- Big buffing brush
- Small angled brush
- Disposable mascara wand
-Big blusher brush
-Flat foundation brush
-Powder sponge

For the white base I started by using Illamsqua skin base foundation, covering her face, neck and ears. After I applied the skin base, I took some loose powder and applied it using the sponge, covering all the areas where I applied the skin base especially eye area because it tends to crease the easiest. After I finished using powder, I started applying the blush, I wanted to only focus on the apples of the cheeks as I noticed that's how Tudor women wore their blush, by taking big rounded blusher brush I packed on red blush only on the apples of the cheeks. For the lips I wanted them to be red but not too bright as I noticed that Tudor women did not were very bright lipsticks more neutral reds, so using small angled brush I applied the desired lip color. Finally for the eye lashes and the eye brows I used disposable mascara wand to apply the white supercolor.


Technical make up lesson - Eyes, lips and eyebrows

Products that I have used:-
- MAC Cool Neutral eyeshadow palette
- Mascara
- Kryolan lip palette

Brushes that I have used:-

- Disposable mascara wand
- Small rounded brush
- Small flat brush
- Angled brush


For the eye make up I used MAC Cool Neutral palette, I took a lighter color and applied all over the lid using small flat brush, because my partner's eye lid is not very big I wanted to use a lighter color to open up the eyes and not make them even smaller using dark color. To define the crease in the lid I used angled brush and applied a darker color. To blend in the colors and make sure there are no harsh lines I took rounded brush and blended it all out. I also applied black mascara on her eye lashes using disposable mascara wand.
For the eye brows I used one of the colors from MAC Cool Neutral palette closest to her natural eye brow color which is medium brown. I used small angled brush to be more precise and make sure I don't over line her natural eyebrow shape.


For the lips I used Kryolan lip palette, I mixed two colors which were orange and more  brown to create more of a neutral color. To apply the mixture I used small angled brush for more precision.